Basic Boat Electronics
By Capt. Charlie Beadon
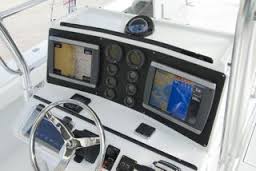
One of the greatest features of new boats are the latest and greatest gadgets. Boat electronics have come a long way and change constantly, but knowing the basics can make boating more enjoyable and safer for you and your family. Today were going to talk about the VHF radio, GPS and sonar. These are the most basic electronics and also the most important for all boats.
First were going to examine the VHF radio. This is a simple, but very important piece of equipment. One of the biggest mistakes that people make when purchasing a VHF radio is to buy a good radio and a cheap antenna. The antenna is the most important part of the radio, so don’t go cheap on this little detail. The VHF can be used for many things; talking to friends, relaying information or to let someone know that you’re in trouble. When talking to friends on the radio the most common channels to use are 5, 6, 71, 78, and 79. These are open channels that anyone can use. In an emergency use channel 16, this is the channel that the U.S. Coast Guard monitors. This channel should only be used in an emergency, for example your boat is sinking or someone on your boat is severely injured. If you have an emergency; put your radio channel on 16, key the microphone and say “may day, may day” this is vessel (vessels name) we have an emergency, and then wait for instructions from the Coast Guard. They will walk you through the rest of the process. Another situation that you may run into is a relay. VHF radios are limited to the distance that the signal can travel and thus you may hear a call from a vessel in distress that the Coast Guard can’t hear. If this ever comes up simply key the microphone and say” this is a relay for vessel (name of vessel that your relaying for)” and relay the message. The other thing that the VHF can be used for is up to date weather. Most VHF radios have a weather button that you can press to hear wind and weather reports from NOAA.
Next, let’s look at the GPS (global positioning system). The GPS works by triangulating three satellite signals to give you a real time position based on your latitude and longitude. When purchasing a GPS I would recommend buying a unit that has a map overlay which will show the position of your boat moving through the map as you are running. The main buttons on most GPS units are: on/off, quit, page, in, out, enter, arrow keys, navigation and menu. The on/off button is used to turn the unit on and off, and also if you tap the button once you can use the arrow keys to adjust the backlight. The quit button is used to scroll back one page and the page button is used to advance forward one page. The in and out buttons control the zoom level on the map, this makes your map more or less detailed. The enter button is used to enter a command or if you have a spot that you want to save simply hold the enter button down until the waypoint screen comes up and enter the appropriate information and enter “OK”. The arrow keys are used to scroll around menus and can also be used to scroll around the map. The navigation button is used to navigate from point to point or to set up routes. For example, say that you want to go from Dolphin Head to your favorite wreck eight miles offshore; simply press the enter button and put in the lat/long for the wreck, save it as a waypoint then go to the navigation menu, press go to point, then waypoints, select the appropriate waypoint and then go to. The GPS unit will draw a line from your position to that point. You can also build a route, in which case you enter multiple points and string them together to create a complete route. The menu button is used to access a whole host of information with in your GPS unit. For example, you can change settings, change points and routes or even look at tides. In my opinion Garmin makes the most user friendly units and would be my pick for most applications.
Finally, let’s take a look at sonar units. Sonar works by sending out sound waves and interpreting the information as it comes back. Sonar can be used for many different things. For example, water depth, scanning bottom structure and marking fish. Your sonar will have two main parts; the transducer which sits in the water and sends and receives sound waves and the head unit which interprets and displays data. If your transducer is set up properly you can get a depth reading while on plane; this can be very helpful when navigating through shallow water. The depth reading is pretty straight forward but reading bottom structure and fish can be more challenging. There a lot of ways to adjust sonar to read data differently, but I only change my range and zoom fields. The range setting allows you to set your head unit to look at a particular depth. I usually leave this setting on automatic unless I want to hone in on a particular depth. For example, say that you want to look at the bottom in 30 feet of water; simple go to range and scroll down to 30 feet and this will lock your machine in at 30 feet. The zoom feature can come in handy, especially when looking at bottom structure. The zoom feature allows you to isolate a particular area on your sonar for a closer look. For example, say that you want to get a good look at the bottom; simply zoom to bottom lock and the bottom will be isolated and blown up for better viewing. In closing, learning to interpret data is going to allow you to make the most out of your sonar. Sonar data is shown in two dimensional so mentally you have to add the three dimensional element. Also, understanding what particular marks represent is very important and come only with practice. For example, a tight ball sitting off of the bottom may be bait fish or a scattered set of lines may be fish or interference.
Captain Charlie Beadon